Additional P10 Experiences

Just sharing some additional P10 experiences I’ve had in 2024. Hopefully it will either be useful or you will never need to know it. Either of which is perfectly ok, but if you’re here, you may need it.

Managed System(s) in “Recovery” status

While installing 15 S1022s, (Firmware 1050.x) a few months back, three of them came up in the “Recovery” state to the HMC. I personally had never seen or experienced this. The common denominator on these three is they were initially powered on manually (via the power button), not via the HMC. Unsure how or why exactly that matters , and since then I believe I saw a firmware, or maybe it was HMC, bug description that sounded similar to this issue maybe it won’t be an issue any longer.

Initially I thought it was a bad result of connecting to HMC not high enough to support the system. But I had 10 initially connected to HMC 1030, and the other 5 were connected to HMC 1050. However, we had two of the 10 error, and one of the 5 so that shouldn’t have been it. Again the only known common denominator was they were powered up manually, regardless of HMC level.

But then when HMC level was rectified, powering on the the other 12 came on just fine. Those 12 never had an error before during or after. Which is strange because none of the 15 ever really established a valid connection, yet were seen by the HMCs. Just the ones that powered on initially got corrupted some how.  I would think corrupting the firmware is a bit harsh for the situation. But as much as I think I’m special on corrupting stuff, I’ve come to realize this problem isn’t unique to me.

For the three in the “Recovery” state I found this procedure :

https://www.ibm.com/docs/en/power9?topic=hmc-recovering-partition-data-managed-system

Yet in this case it doesn’t apply/can’t be used because they are new, never been seen by HMC so no backup data on the HMC to recover from. So the only other method is to reset system settings via BMC port. This does wipe out all partition data, but other than the pesky service partition we have nothing to lose anyway. The procedure is listed at the end of this section. But I also want to share other problem instances that this procedure has become the magic cure all.

I since have remembered reading a situation from Jaqui Lynch where a system came in some default factory build mode and it too had to be reset. Leading to a similar “recovery”  set of steps.

Connection Failed, Firmware corrupted

In late August 2024, we had 2 of 3 L1022s that also had to be factory reset. After initial connection, power on, password, did the VMI, then later the eBMC (ASMI) showed no connection (or connection failedl I don’t really remember which one). At some point we encountered a, Firmware was corrupted, message and needed to be reloaded. This same reset did appear to fix it.

New E1050 Power On failure

Late September, new install with HMC v1060 and system firmware level 1060.x we had one of eight E1050s that wouldn’t power on. After about ~3minutes it would hit just display if failed to power on. It powers up, ramps up the fans, for ~40 seconds, fans spin down quickly and shuts down to standb. It then waits ~20 seconds, then it tries again. This occurs three times. The last time it just turns on the LED, keeps the fans up high, and leaves it in the error state.
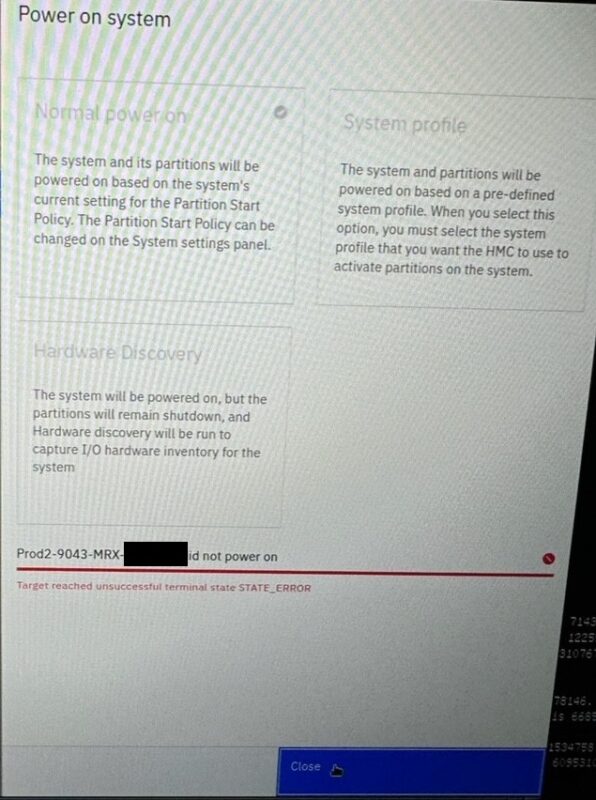
I don’t know a good reason to leave it running that way so I told it to power off. I unplugged for 10 minutes, tried again, same result. I unplugged, popped open the lid, with gloves lightly pressed down and around to see if I could find anything obviously loose, and nothing. Though I could hear and see all four fans working, and they were installed onsite, I thought man is one of them not making a good connection. But nope, that’s not it. After engaging support, it too appears this same reset procedure fixed it. I can’t say I expected that to be the resolution.

The reset procedure was:

1. Login to the ASMI
2. Power Off server
3. Go into settings, reset server settings
4. There are two options:
a. Reset server settings: Resets the server settings only.
b. Reset BMC and server settings: Resets both the server and the BMC settings.
5. Select – a. Reset server settings only
6. Under power settings make sure it is set to user initiated (standby)
7. Check LMB is set to 256MB
8. Log out of ASMI
9. Go to the HMC GUI
10. Reconfigure the VMI

MISC Factory Inconsistencies

Adapter placement

On occasion we are getting I/O cards not placed in the adapter placement recommended best practices order. I’m not saying I’m moving cards on every install, but it is greater than zero. Though non-SR-IOV slots are more and more rare, we’ve had to move some for that reason . Seems to be primarily for IBM I we had to move to SR-IOV slots. Some of it isn’t even swapping cards/slots, some is just a pure move to both a preferred and SR-IOV capable one.

Mismatch adapter microcode

I’ve also had like adapters come with different levels of microcode. Overall that one is rare, and could simply just be some from different batches. I’ve only hit that once in the last year or so. But would be nice if they were uniform/checked/the same from the factory. Maybe make real use of that otherwise service partition.

Quality Control

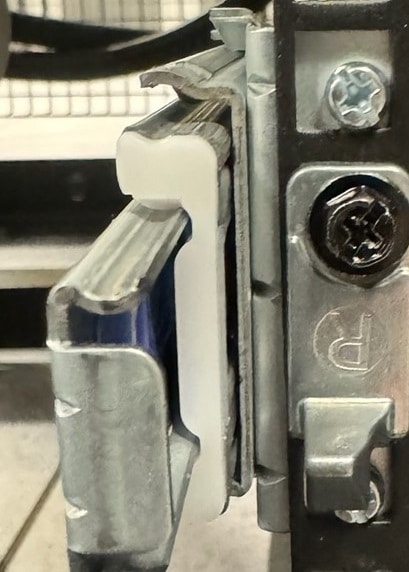
I have encountered some odd QC stuff. For instance the R logo stamped on front latch of the E1050 upside down. One of three was this way. There is only one way they go on so not even I can put it on upside down. But just looks very lackluster. So don’t stare at it after it’s installed.
Which HMC port comes factory covered with a tab varies. This is definitely not a technical problem but still just an odd example of differences. I only noticed because I was having a connection problem to one. I pulled the IP off the panel, hard wired in and couldn’t communicate with it. For some, embarrassingly enough, 10 minutes later notice I wasn’t plugged into the HMC1 port at all it was still covered. But on the other two systems the HMC2 port was covered. I actually do run into this one quite a bit. Because once it happened I made a mental note to always look now. For dual HMCs I take the tab off anyway, so it doesn’t matter, but that’s less maybe 20% of the time I have dual HMCs. So If I tell someone else to cable the free/open/uncovered port, they can be unintentionally mismatched.

Missing all four of the main tiny screws from the HMC kit for rail attachment to the HMC. They are unique and not plentiful to find more from other device kits. We weren’t missing one, but all. In my case we had dual HMCs so I took half the screws from the other HMC kit and it was fine.

Historically problems with the kits, factory configurations, hardware are extremely few and far between. I believe in the last year I’ve hit more than usual. Nothing awful, show stopping issues. But it does delay things from progressing.


Spectrum Virtualize CMMVC5969E Error

First off, prior to finding this that you are reading currently, I can only assume you tried internet searching this error as I did. I found nothing of any value in troubleshooting the problem above and beyond what the actual error message states. So hopefully you find this tip helpful.

For reference the full error is:

“CMMVC5969E The Remote Copy relationship was not created, either because there are no online nodes in the I/O group or because there are unrecovered FlashCopy mappings or unrecovered Global Mirror or Metro Mirror relationships in the I/O group”

This error was encountered when creating additional remote copy relationships. We started with a new IBM FS7300 storage unit, created ~ 150 relationships over a couple weeks time from an existing v7000. When adding more we hit this error. Now we checked and tried things the error message suggested, like FlashCopy mappings, of course the I/O group is online,  to no avail. So instead of boring you with all the history, let me just get straight to the resolution.

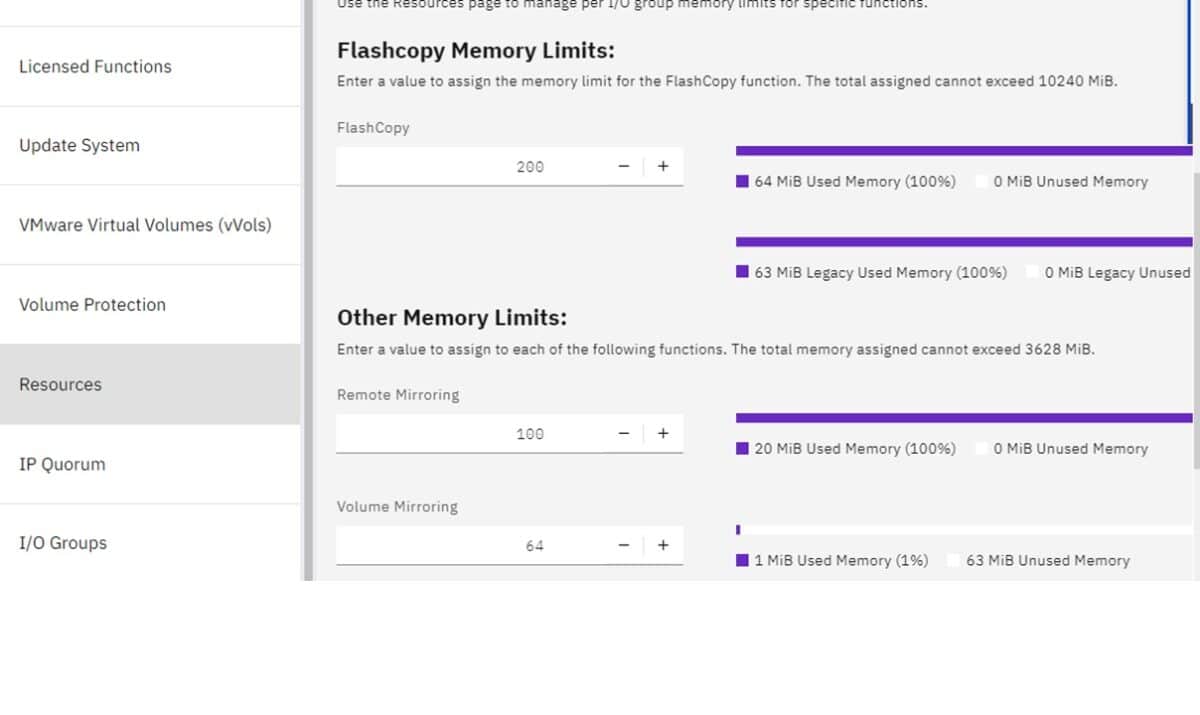
It turns out to a be a default memory limitation on some functions. In this case remote mirroring of 20MB, it had been exhausted. We checked and sure enough it was 20MB with 0 free as can be seen via lsiogrp 0.

remote_copy_total_memory 20.0MB

remote_copy_free_memory 0.0MB

We changed it to 100MB via the GUI, under Resources, to match the source system as shown below screen shot.

 We  could then create all relationships, added them to the CG, started replication just fine. The new totals ended being as follows.

remote_copy_total_memory 100.0MB

remote_copy_free_memory 46.7MB

Now there are similar settings for FlashCopy and Volume Mirroring. In our case we also changed the FlashCopy to 200MB to match our source system. Ultimately our new storage is replacing the existing so we probably should’ve started like for like. I simply didn’t know any better. Hopefully if you read this, you didn’t either, but you do now.

QHA – PowerHA Cluster Status Utility

Copy and paste the following script in your path somewhere and make it executable.  The following flags are valid and explained below. I personally use qha -nev the most.

qha version 9.06
Usage: qha [-n] [-N] [-v] [-l] [-e] [-m] [-1] [-c]
-n displays network interfaces
-N displays network interfaces + non IP heartbeat disk
-v shows online VGs
-l logs entries to /tmp/qha.out
-e shows running event
-m shows appmon status
-1 single interation
-c shows CAA SAN/Disk Status (AIX7.1 TL3 min.)


#!/bin/ksh
# Purpose: Provides an alternative to SNMP monitoring for PowerHA/HACMP (clinfo and clstat).
# Designed to be run within the cluster, not remotely. See next point!
# Can be customised to run remotely and monitor multiple clusters!
# Version: 9.06
# Updates for PowerHA version 7.1
# Authors: 1. Alex Abderrazag IBM UK
# # 2. Bill Miller IBM US
# Additions since 8.14.
# qha can be freely distributed. If you have any questions or would like to see any enhancements/updates, please email abderra@uk.ibm.com

# VARS
export PATH=$PATH:/usr/es/sbin/cluster/utilities
VERSION=`lslpp -L |grep -i cluster.es.server.rte |awk '{print $2}'| sed 's/\.//g'`
CLUSTER=`odmget HACMPcluster | grep -v node |grep name | awk '{print $3}' |sed "s:\"::g"`
UTILDIR=/usr/es/sbin/cluster/utilities
# clrsh dir in v7 must be /usr/sbin in previous version's it's /usr/es/sbin/cluster/utilities.
# Don't forget also that the rhost file for >v7 is /etc/cluster/rhosts
if [[ `lslpp -L |grep -i cluster.es.server.rte |awk '{print $2}' | cut -d'.' -f1` -ge 7 ]]; then
    CDIR=/usr/sbin
else
    CDIR=$UTILDIR
fi
OUTFILE=/tmp/.qha.$
LOGGING=/tmp/qha.out.$
ADFILE=/tmp/.ad.$
HACMPOUT=`/usr/bin/odmget -q name="hacmp.out" HACMPlogs | fgrep value | sed 's/.*=\ "\(.*\)"$/\1\/hacmp.out/'`
COMMcmd="$CDIR/clrsh"
REFRESH=0
usage() {
echo "qha version 9.06"
echo "Usage: qha [-n] [-N] [-v] [-l] [-e] [-m] [-1] [-c]"
echo "\t\t-n displays network interfaces\n\t\t-N displays network \
interfaces + nonIP heartbeat disk\n\t\t-v shows online VGs\n\t\t-l logs entries to \
/tmp/qha.out\n\t\t-e shows running event\n\t\t-m shows appmon status\n\t\t-1 \
single interation\n\t\t-c shows CAA SAN/Disk Status (AIX7.1 TL3 min.)"
}

function adapters {
i=1
j=1
cat $ADFILE | while read line
do
    en[i]=`echo $line | awk '{print $1}'`
    name[i]=`echo $line | awk '{print $2}'`
    if [ i -eq 1 ]; then
      printf " ${en[1]} ";
    fi
    if [[ ${en[i]} = ${en[j]} ]]; then
        printf "${name[i]} "
    else
        printf "\n${en[i]} ${name[i]} "
    fi
let i=i+1
let j=i-1
done
rm $ADFILE
if [ $HBOD = "TRUE" ]; then # Code for v6 and below only. To be deleted soon.
    # Process Heartbeat on Disk networks (Bill Millers code)
    VER=`echo $VERSION | cut -c 1`
    if [[ $VER = "7" ]]; then
        print "[HBOD option not supported]" >> $OUTFILE
    fi
    HBODs=$($COMMcmd $HANODE "$UTILDIR/cllsif" | grep diskhb | grep -w $HANODE | awk '{print $8}')
    for i in $(print $HBODs)
    do
        APVID=$($COMMcmd $HANODE "lspv" | grep -w $i | awk '{print $2}' | cut -c 13-)
        AHBOD=$($COMMcmd $HANODE lssrc -ls topsvcs | grep -w r$i | awk '{print $4}')
        if [ $AHBOD ]
            then
            printf "\n\t%-13s %-10s" $i"("$APVID")" [activeHBOD]
        else
            printf "\n\t%-13s %-10s" $i [inactiveHBOD]
        fi
    done
fi
}
function work {
HANODE=$1; CNT=$2 NET=$3 VGP=$4
#clrsh $HANODE date > /dev/null 2>&1 || ping -w 1 -c1 $HANODE > /dev/null 2>&1
$COMMcmd $HANODE date > /dev/null 2>&1
if [ $? -eq 0 ]; then
    EVENT="";
    CLSTRMGR=`$COMMcmd $HANODE lssrc -ls clstrmgrES | grep -i state | sed 's/Current state: //g'`
    if [[ $CLSTRMGR != ST_STABLE && $CLSTRMGR != ST_INIT && $SHOWEVENT = TRUE ]]; then
        EVENT=$($COMMcmd $HANODE cat $HACMPOUT | grep "EVENT START" |tail -1 | awk '{print $6}')
                  printf "\n%-8s %-7s %-15s\n" $HANODE iState: "$CLSTRMGR [$EVENT]"
    else
        printf "\n%-8s %-7s %-15s\n" $HANODE iState: "$CLSTRMGR"
    fi
    $UTILDIR/clfindres -s 2>/dev/null |grep -v OFFLINE | while read A
    do
        if [[ "`echo $A | awk -F: '{print $3}'`" == "$HANODE" ]]; then
            echo $A | awk -F: '{printf " %-18.16s %-10.12s %-1.20s", $1, $2, $9}'
            if [ $APPMONSTAT = "TRUE" ]; then
                RG=`echo $A | awk -F':' '{print $1}'`
                APPMON=`$UTILDIR/clRGinfo -m | grep -p $RG | grep "ONLINE" | awk 'NR>1 {print $1" "$2}'`
                print "($APPMON)"
            else
                print ""
            fi
        fi
    done
    if [ $CAA = "TRUE" ]; then
        IP_Comm_method=`odmget HACMPcluster | grep heartbeattype | awk -F'"' '{print $2}'`
        case $IP_Comm_method in
            C) # we're multicasting
                printf " CAA Multicasting:"
                $COMMcmd $HANODE lscluster -m | grep en[0-9] | awk '{printf " ("$1" "$2")"}'
                echo ""
                ;;
            U) # we're unicasting
                printf " CAA Unicasting:"
                $COMMcmd $HANODE lscluster -m | grep tcpsock | awk '{printf " ("$2" "$3" "$5")"}'
                echo ""
                ;;
        esac
        SAN_COMMS_STATUS=$(/usr/lib/cluster/clras sancomm_status | egrep -v "(--|UUID)" | awk -F'|' '{print $4}' | sed 's/ //g')
        DP_COMM_STATUS=$(/usr/lib/cluster/clras dpcomm_status | grep $HANODE | awk -F'|' '{print $4}' | sed 's/ //g')
        print " CAA SAN Comms: $SAN_COMMS_STATUS | DISK Comms: $DP_COMM_STATUS"
    fi
    if [ $NET = "TRUE" ]; then
        $COMMcmd $HANODE netstat -i | egrep -v "(Name|link|lo)" | awk '{print $1" "$4" "}' > $ADFILE
        adapters; printf "\n- "
    fi
    if [ $VGP = "TRUE" ]; then
        VGO=`$COMMcmd $HANODE "lsvg -o |fgrep -v caavg_private |fgrep -v rootvg |lsvg -pi 2> /dev/null" |awk '{printf $1")"}' |sed 's:)PV_NAME)hdisk::g' | sed 's/:/(/g' |sed 's:):) :g' |sed 's: hdisk:(:g' 2> /dev/null`
        if [ $NET = "TRUE" ]; then
              echo "$VGO-"
        else
            echo "- $VGO-"
        fi
    fi
    else
        ping -w 1 -c1 $HANODE > /dev/null 2>&1
        if [ $? -eq 0 ]; then
            echo "\nPing to $HANODE good, but can't get the status. Check clcomdES."
        else
            echo "\n$HANODE not responding, check network availability."
        fi
fi
}

# Main
NETWORK="FALSE"; VG="FALSE"; HBOD="FALSE"; LOG=false; APPMONSTAT="FALSE"; STOP=0;
CAA=FALSE; REMOTE="FALSE";
# Get Vars
while getopts :nNvlem1c ARGs
do
   case $ARGs in
        n) # -n show interface info
            NETWORK="TRUE";;
        N) # -N show interface info and activeHBOD
            NETWORK="TRUE"; HBOD="TRUE";;
        v) # -v show ONLINE VG info
            VG="TRUE";;
        l) # -l log to /tmp/qha.out
            LOG="TRUE";;
        e) # -e show running events if cluster is unstable
            SHOWEVENT="TRUE";;
        m) # -m show status of monitor app servers if present
            APPMONSTAT="TRUE";;
        1) # -1 exit after first iteration
            STOP=1;;
        c) # CAA SAN / DISK Comms
            CAA=TRUE;;
        \?) printf "\nNot a valid option\n\n" ; usage ; exit ;;
    esac
done
OO=""
trap "rm $OUTFILE; exit 0" 1 2 12 9 15
while true
do
    COUNT=0
    print "\\033[H\\033[2J\t\tCluster: $CLUSTER ($VERSION)" > $OUTFILE
    echo "\t\t$(date +%T" "%d%b%y)" >> $OUTFILE
    if [[ $REMOTE = "TRUE" ]]; then
        Fstr=`cat $CLHOSTS |grep -v "^#"`
    else
        Fstr=`odmget HACMPnode |grep name |sort -u | awk '{print $3}' |sed "s:\"::g"`
    fi
    for MAC in `echo $Fstr`
    do
        let COUNT=COUNT+1
        work $MAC $COUNT $NETWORK $VG $HBOD
    done >> $OUTFILE
    cat $OUTFILE
    if [ $LOG = "TRUE" ]; then
        wLINE=$(cat $OUTFILE |sed s'/^.*Cluster://g' | awk '{print " "$0}' |tr -s
        '[:space:]' '[ *]' | awk '{print $0}')
        wLINE_three=$(echo $wLINE | awk '{for(i=4;i<=NF;++i) printf("%s ", $i) }')
        if [[ ! "$OO" = "$wLINE_three" ]]; then
            # Note, there's been a state change, so write to the log
            # Alternatively, do something addtional, for example: send an snmp trap
            alert, using the snmptrap command. For example:
            # snmptrap -c <community> -h <anmp agent> -m "appropriate message"
            echo "$wLINE" >> $LOGGING
        fi
        OO="$wLINE_three"
    fi
    if [[ $STOP -eq 1 ]]; then
        exit
    fi
sleep $REFRESH
done

S1024 Install Lessons Learned – VMI, HMC ML1030, Hypervisor Overhead

Following are some lessons learned during a recent S1024 system install.

Virtual Management IP (VMI)

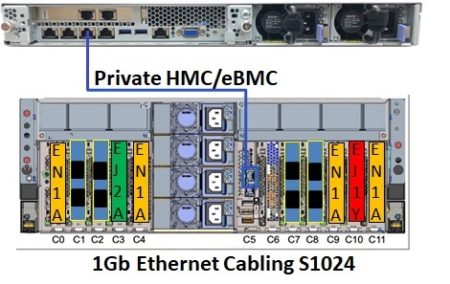
This is new in HMC V10R1M1020. Since this is the only system our new 7063-CR2 HMC will manage we ran a direct cable connection straight from our designated private port on the HMC to the top/first eBMC port on the back of the S1024 as shown in pic below.  Though not completely relevant if it is direct or switch attached or not it’s just more of an FYI of our environment.

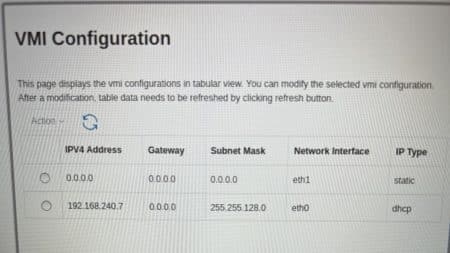
Upon connecting, the HMC DHCP server successfully assigned an IP address. The output shown below is after initial connection. Notice, which actually took me a minute to get my attention, that the numbers on the end are the DHCP IP address it was assigned.
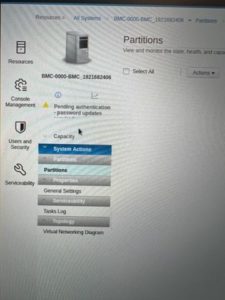
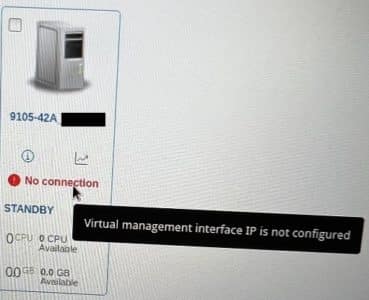
We entered the HMC password to get it to authenticate and showed the system in standby node as normal. However, shortly thereafter it showed “No Connection”.  Wait, what? Why? When the mouse went over the message the pop-up of “Virtual management interface IP is not configured” is shown. Of course it is, right? Wrong!

So what is the VMI? Well that’s a great question. My personal goto, the redbooks, on P10 Scale Out systems only mentions this:

Well that’s only partially informative of what it is, and doesn’t show how to configure it.  Upon further searching with the HMC level of 1020 I found Hari’s blog explaining the new features  and one of them is the VMI.

His blog entry is here:

https://community.ibm.com/community/user/power/blogs/hariganesh-muralidharan1/2022/07/27/whats-new-in-hmc-10110200

It’s quite good at explaining what it is, yet still doesn’t tell where/how to set it.

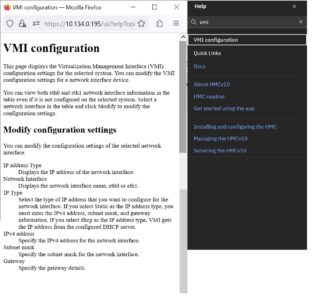
Ok, time to search the HMC itself. When utilizing the search in M1020 nothing comes back. When doing so in M1030 the following info, in pic below, is shown. Which again tells about the options but not WHERE to set it.

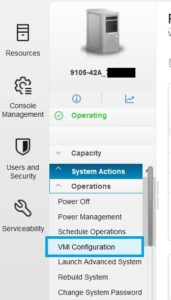
So, I just break down and start looking around manually and FINALLY found it.  Now the GUI  does differ a bit between M1020 and M1030 and I provide pics of both.  The short of it is, it is located under System actions.

In M1020 select the system and then in top left, System Actions->Operations->VMI Configuration as shown in pic below left:


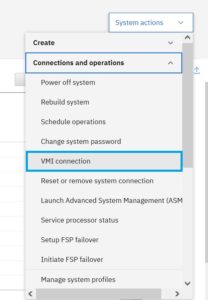
In M1030, pic above right, select the system and then in top right expand the “Systems actions” tab and scroll down “Connection and Operations” and click on “VMI connection”.

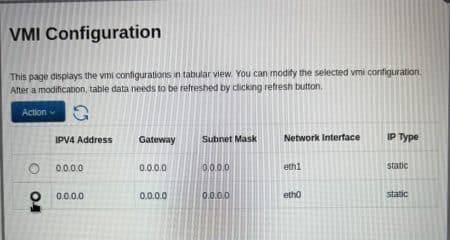
Once selected you are then displayed with the following screen that will show for both ports.


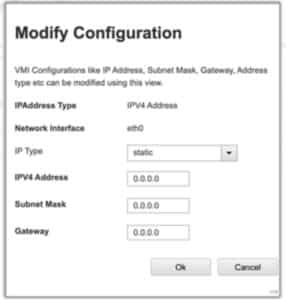
We choose the eth0 port, action, and set it as type “dynamic”. Though it does default to static as shown below:

Once completed it ultimately resolved our “No Connection” problem.

After originally posting this article, Andrey Klyachkin shared via Twitter the following link to fantastic EBMC videos.

https://mediacenter.ibm.com/channel/POWER10%2B%2BEBMC%2BVideo%2BSeries/257624232

The one on the top 3 things, includes the VMI and it is here.


Hypervisor Overhead

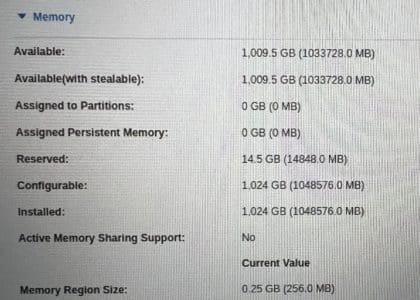
This brand new 9105-42A system with 24 cores/1TB memory/EMX0 expansion unit has consumed over 14.5GB in overhead before configuring a single partition. That seems like a lot from the start. The system also consists of following adapters:

  • (4) EC2U 25/10 Gb NIC & RoCE SFP28 Adapters (SR-IOV capable)
  • (4) EN1A 32Gb 2-port Fiber Channel PCIe3 Adapters
  • (1) EN1C 16Gb 4-port Fiber Channel PCIe3 Adapter
  • (1) EJ10 SAS 6Gb 4-Port PCIe3 Adapter
  • (1) EJ2A Expansion I/O drawer Adapter

Upon further review, testing, and feedback from support line we have surmised the following.  Support previously informed us via another customer of “the two SRIOV adapters in shared mode use 5.25g”.  Enabling the EC2U adapters from dedicated to shared mode had NO effect on the overhead. There appears no way to get that overhead back. This at a rate of ~ 2.6GB per card.  Since we know there is about 5.25GB for two cards, and this environment has four of those cards, that explains ~10.5GB of the overhead from the very beginning. There is also another 1.25GB required for the VMI “hidden partition”. The DMA for the card slots is another ~2GB (not including expansion drawer, if applicable). That explains almost all of the reserved overhead.  Like or it not, that does work out about right.

So how would’ve we known this? Use the System Planning Tool (SPT). We did that. It’s all over the map. It says with our hardware config and with ONLY the two VIOS configured it would use 87.5GB. WHAT?! No way. Oh wait, it defaults to firmware memory mirror enabled, turned that off and now shows 42.5GB without any other LPARs built out. Once filling in all the LPAR sizes it comes back with ~63GB.

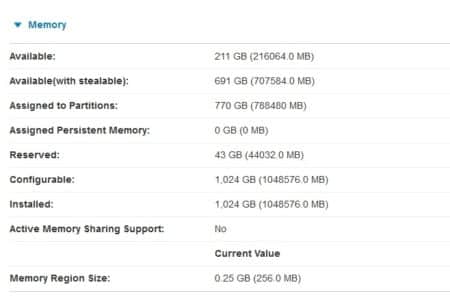
For comparison, in our real environment we configured all 21 lpars, with NPIV, VNIC, some VSCSI and used 43GB as shown in pic below.

That is a delta of almost 50%. But I suspect it’s better to estimate an overage than a shortage.  But still not particularly close.


1030.01(030) System Firmware

This new S1024 came preinstalled with fw1020.10 (85) as shown below.

A newer version, 1030.01(030) is already available so of course we want to implement the latest and greatest.

Following below is the special instructions that come with the updated firmware level. It is important and yet only partially helpful. I’ll explain why as I learned, well relearned I suppose is more correct, the hard way.

First off it says, “Concurrent Service Pack”. This normally implies it is non-disruptive, that is absolutely not the case. As shown in the following preview screen before installing it clearly says it’s disruptive.

Secondly because of a known issue it says you must install it twice consecutively, which is completely correct. As the level shown after the first install follows below you can see the install and activated levels differ.

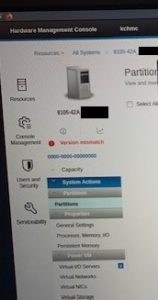
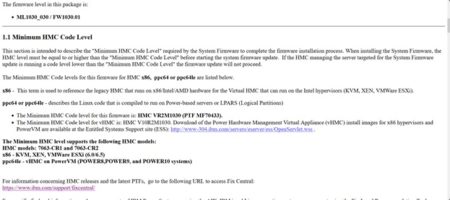
What is not explicitly called out in the special instructions that the HMC version must be a minimum of V10R2M1030.  The “Check Readiness” prior to performing a firmware update has nothing to do with checking the target level at all, it’s doesn’t even know what you are going to update to just if the system is in a state of Ready to perform an update. You can still install the firmware update the first time, to complete it and then lose access to the managed system with the dreaded “Version Mismatch” message as shown below:

Though we already had plans to updating HMC to latest and greatest we weren’t planning on doing so right this minute, but that has changed. Note, it’s not an update, it’s an upgrade, so it too is completely disruptive. But upgrading to V10R2M1030 did indeed resolve the mismatch.

Upon further review, thanks Tsvetan Marinov for the reminder, the HMC M1030 requirement is clearly covered in the 01ML1030_026_026.html  file. But for reasons I can’t explain why we didn’t get that file in our download as shown below.

Contents of that html file can also be found here. The main bit about the HMC version required is seen below:

A long history of experience means I should’ve known better. But those new to it, may not know at all.

Disabling telnet in AIX or VIOS

Disabling telnet, and ftp for that matter,  is a very common procedure because of their inherit security flaw(s).

In a nutshell it requires commenting them out in /etc/services by putting a # in front of the corresponding line.

Then update inetd by running refresh -s inetd.

So I put together this quick little video to demonstrate. In this one it happens to be on a VIOS.

JVM memory bug in HMC V9R2M950

We had a customer run into this bug. Their HMC has 7 POWER9 Managed systems and 150 LPARs with Simplified Remote Restart enabled. This is resulting in rebooting the HMC about every 10 days while on Details below came from the following link. So always check the link for updated information.

https://www.ibm.com/support/pages/node/6398722

Problem

Navigating the HMC Enhanced UI can result in the page displaying the following messages:

Proxy Error

The proxy server received an invalid response from an upstream server.
The proxy server could not handle the request GET /ui/sfp/.

Reason: Error reading from remote server

Symptom

The HMC Enhanced UI becomes unusable soon after a reboot of the HMC with only a few hours or a few days of run time.  Managing virtual i/o servers, partitions and managed systems becomes impossible once the “Proxy Error” is returned.

Typically, the symptom is reported after upgrading an existing HMC to V9R2M950 and the problems begin. However, any scratch install or new install of V9R2M950 can exhibit the same problems.

Other related SRCs can also report on the HMC:

E212E116: exceeded the number of threads
E332FFFF: Java dump posted
E23D040C: [*PCERROR-D] core dump of a process
E23D0503: core dump of a process
E3D46FFF: call home exception

Cause

The core JVM is running out of memory due to the enablement of the Simplified Remote Restart capability for some or all partitions.  The more managed systems being managed and the more partitions with the feature enabled the faster the JVM runs out of memory.

Environment

7063-CR1
Virtual Appliance for x86
Virtual Appliance for ppc
HMC Version 9 Release 2 M950

Diagnosing The Problem

Anytime the “Proxy Error” is returned at V9R2M950 after some uptime following a reboot of the HMC confirms this problem as the issue.

Resolving The Problem

The workaround is to reboot the HMC whenever the “Proxy Error” is received, providing relief for some time until the JVM runs out of memory again.  Disabling Simplified Remote Restart across the entire customer environment is another workaround to avoid the reboots.

Reinstalling the HMC will not resolve the cause of the problem.

An official fix is being developed to provide on fix central for this issue in a February 2021 PTF.

7063-CR1 HMC Loses date after power outage

This is a weird one that we ran into here at Clear Technologies.

Backstory

Customer had planned prolonged power outage and after restoring power and booting the system it had lost it’s date. It is very rare because it can only occur on certain days of the year, roughly 6 of them when power is turned off at the end of one month and turned back on the next month, even if that’s just a couple hours apart. Truly a rare encounter for sure. Below is more details and fix to the problem.


https://www.ibm.com/support/pages/7063-cr1-hmc-incorrect-date-and-time-when-powered-back-after-being-powered-period-time


VIOS 3.1x upgrade issues

There is a known problem after upgrading your VIOS using the viosupgrade tool. IF your media repository resides on rootvg, which is often the case, it will no longer exist post upgrade. So you can either move it to non-rootvg disks, or save off/copy it’s contents elsewhere and recreate it after the upgrade. I did find additional details on this and it is available at:

https://www.ibm.com/support/pages/viosupgrade-virtual-media-library-lost-after-viosupgrade

There is another lessor known issue when upgrading and utilizing SEA and VLAN tagging.

Details are here:  https://theibmi.org/2020/07/16/new-vios-releases-affect-the-shared-ethernet-adapter-sea-functionality/

3004-010 Failed setting terminal ownership and mode

3004-010 Failed setting terminal ownership and mode

Hopefully you or someone else is only encountering this while trying to login to an AIX system. If you already have a login session open on the system it may be an easy fix, if you don’t, and NO ONE else does either, it’s a bit more complicated.

Backstory

This is based on a real world customer experience I had on Halloween night 2019. Though I did find some online info to help it took a while. I’m doing this in hopes that it’s another hit that will help others with more detail.

So customer’s users started getting this error when trying to login, though all had been working fine all day. The short story is, it was the result of the /etc/group file getting overwritten by mistake with another file.

Before reading on, IF you have encountered the 3004-010 error AND you still have an active login somewhere on the system, you can simply open the /etc/group file and cut/paste contents from another /etc/group file from another system, or restore it from a mksysb, and save a lot of time and grief. Remember right now you can’t do any new scp or anything remotely to the box.

The long story, after the problem was encountered it was decided to reboot the system for reasons I am unaware. It was hard rebooted via the HMC. Upon bootup, many messages, 0513-012 and 0481-002, about failures to start daemons/process were encountered because of user id and no recognized group in /etc/group. This is the point in which I got engaged via an SOS call. Specifics shown below:

Recovery

In this case it required another bootable AIX image and boot into SMS mode to use it. The typical options are boot from a mksysb or AIX install ISO of the same level via either a NIM server, VIOS virtual optical, or physical DVD. In this exact case, the machines were full system LPARs w/o a NIM server or VIOS, we actually resorted to physical media.

Via Media

We did this by activating the profile, via HMC, then chose advanced, then SMS, then ok (twice). After a few minutes we get a prompt to press 1 for console and hit enter, then 1 for English, then on next menu chose 3 to enter single user mode.

Chose the rootvg disk (or what you think it is) and it will it show lvs that belong to that vg and if it looks like rootvg then chose that one. If not, repeat until you find it. Then Chose #1 to access root volume group. This mounted filesystems for us.

We ran /etc/methods/cfg64 so our commands would work right. We copied /etc/group to /etc/group.orig. We did find the contents of /etc/group actually had /etc/sudoers contents in it. It would appear the sudoers file was copied over the group file some how. But what it was wasn’t as important as what it wasn’t. In this case they had some previous copies of /etc/group so we copied one over from a couple days back simply to get the system bootable again.

Once booted, we were able to login as root, then scp a prod version of the group file over and all was well again.

Via Clone

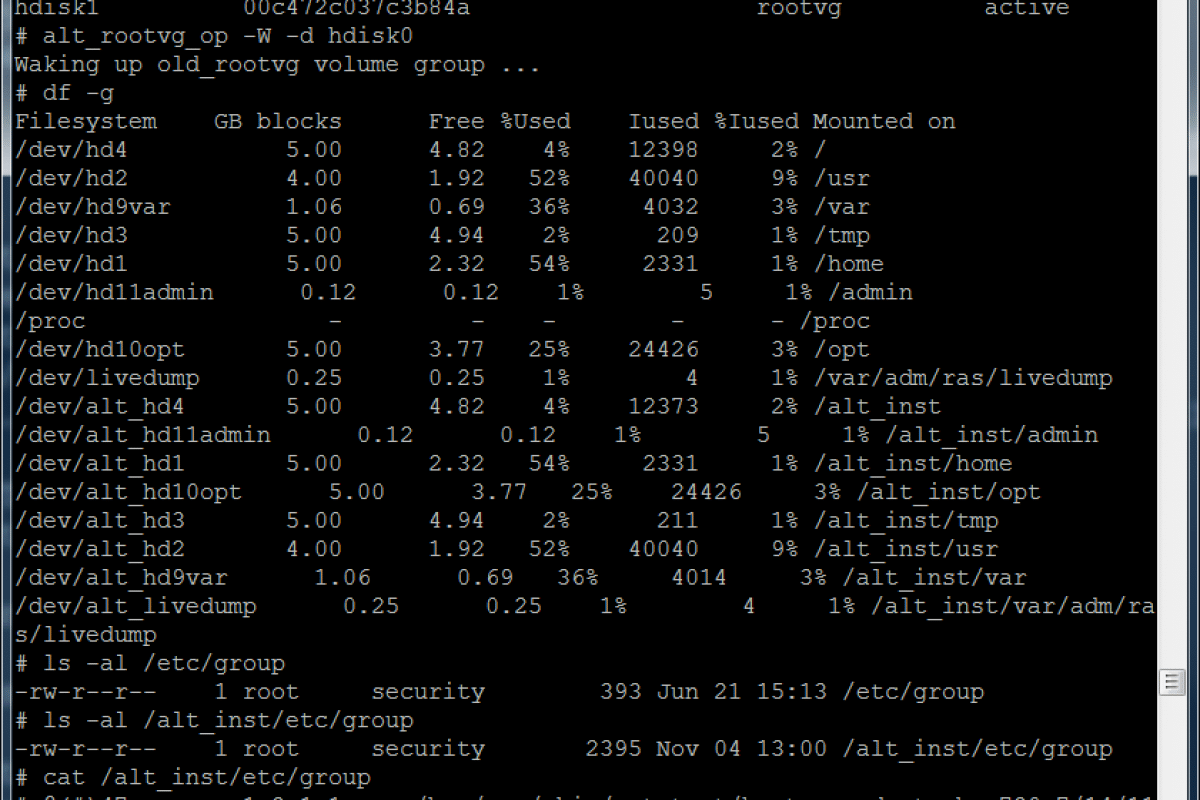
However, another potential option is, if available, booting from an existing clone of rootvg. In my case the customer did have a clone, however, it really didn’t come to light they did until AFTER we were able to successfully boot and login. That got me thinking we could’ve booted into SMS mode, and chose the clone rootvg disk instead, and finished normal booting. Then we could wake up the original rootvg, copy the cloned /etc/group file over, put the original rootvg back to sleep, set bootlist and reboot from the original rootvg again. So I tested this theory and proved it to be successful as follows.

In this test I intentionally clobbered the /etc/group file and rebooted the system to produce the errors and problem as previously described. I did then SMS boot from the cloned disk. I woke up the “old_rootvg”, which is the real/original/current rootvg that the bad group file is on, via:

alt_rootvg_op –W –d hdisk0

This mounts the other rootvg filesystems with alt_inst in front of their paths. I checked both versions of the group file group existed. They did and differed greatly. I actually saw /etc/hosts info in the original version of the group file.  I simply copied the group file from my clone copy over the original version that is currently available in /alt_inst/etc as shown below. If though the group file is trash I still make a copy of it first.

cp –p /alt_inst/etc/group /alt_inst/tmp/group

cp –p etc/group /alt_inst/etc/group

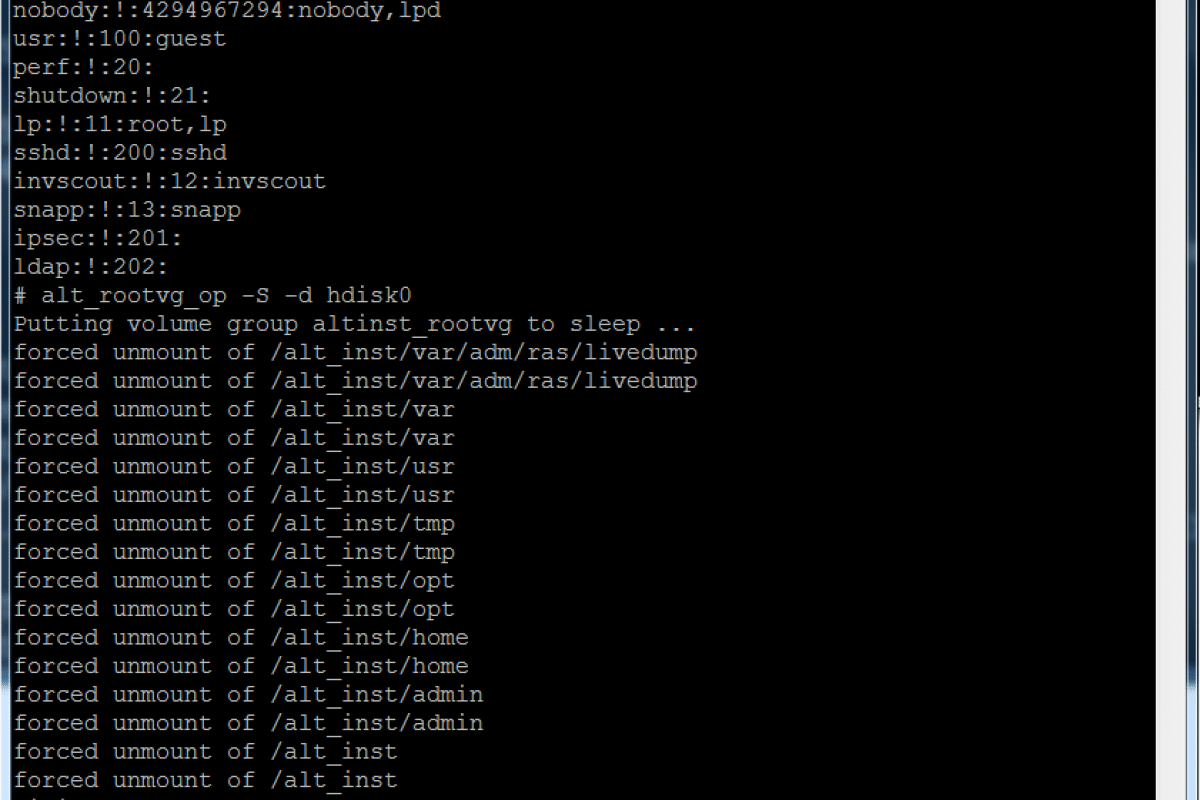
Then I put the original rootvg back to sleep <VERY IMPORTANT STEP as you can corrupt it if you don’t prior to rebooting> and then change bootlist to boot from it as shown both below in text and screenshots. Then after successful reboot, login as normal and enjoy the rest of your day.

alt_rootvg_op –W –s hdisk0

bootlist –m normal hdisk0 hdisk1

shutdown -Fr

alt_disk_copy hangs on mkszfile

alt_disk_copy hangs on mkszfile

Backstory

This occurred after I created a clone of existing system, ultimately with the intent to test upgrade, and brought up a test lpar on the newly created clone. I also enabled ghostdev to eliminate it coming up with same IP, vgs, etc.

Problem

I wanted to update rootvg by cloning and updating the clone at the same time. When executing the command it just hung

# alt_disk_copy -b update_all -l /mnt/7232 -B -d hdisk1
Calling mkszfile to create new /image.data file.
^CCleaning up.

Solution

I learned that this was a by product of having the original systems /etc/filesystems file that still had the cloned systems filesystems in it. I have learned in the past, and failed to do so this time, that when cloning a system like this to make a copy of /etc/filesystems, remove all non-rootvg entries in the original before making the clone. Then of course copy the original back into place post clone creation. Once I removed the additional entries the command ran just fine.