Share this:
Posted in:
Shawn Bodily's POWER/AIX/AI BlogFollowing are some lessons learned during a recent S1024 system install.
Virtual Management IP (VMI)
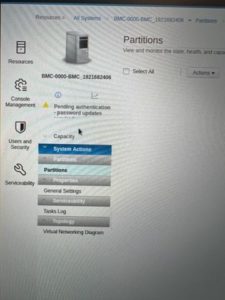
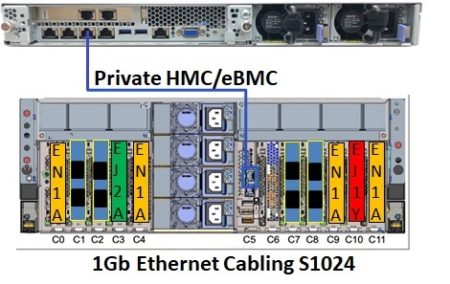
This is new in HMC V10R1M1020. Since this is the only system our new 7063-CR2 HMC will manage we ran a direct cable connection straight from our designated private port on the HMC to the top/first eBMC port on the back of the S1024 as shown in pic below. Though not completely relevant if it is direct or switch attached or not it’s just more of an FYI of our environment.
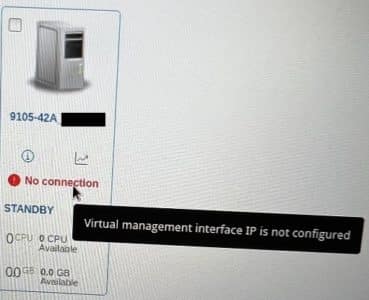
We entered the HMC password to get it to authenticate and showed the system in standby node as normal. However, shortly thereafter it showed “No Connection”. Wait, what? Why? When the mouse went over the message the pop-up of “Virtual management interface IP is not configured” is shown. Of course it is, right? Wrong!
So what is the VMI? Well that’s a great question. My personal goto, the redbooks, on P10 Scale Out systems only mentions this:
Well that’s only partially informative of what it is, and doesn’t show how to configure it. Upon further searching with the HMC level of 1020 I found Hari’s blog explaining the new features and one of them is the VMI.
His blog entry is here:
It’s quite good at explaining what it is, yet still doesn’t tell where/how to set it.
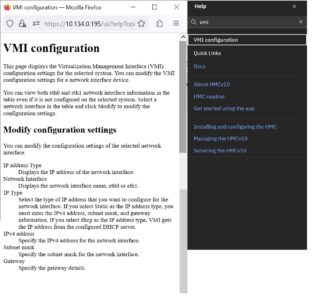
Ok, time to search the HMC itself. When utilizing the search in M1020 nothing comes back. When doing so in M1030 the following info, in pic below, is shown. Which again tells about the options but not WHERE to set it.
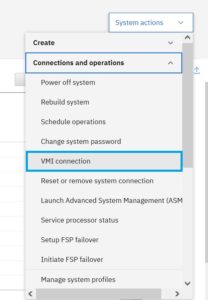
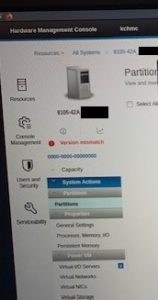
So, I just break down and start looking around manually and FINALLY found it. Now the GUI does differ a bit between M1020 and M1030 and I provide pics of both. The short of it is, it is located under System actions.
In M1020 select the system and then in top left, System Actions->Operations->VMI Configuration as shown in pic below left:
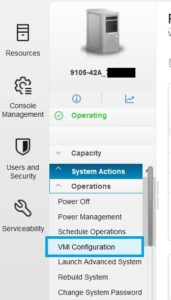
In M1030, pic above right, select the system and then in top right expand the “Systems actions” tab and scroll down “Connection and Operations” and click on “VMI connection”.
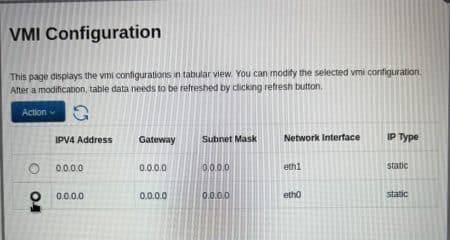
Once selected you are then displayed with the following screen that will show for both ports.
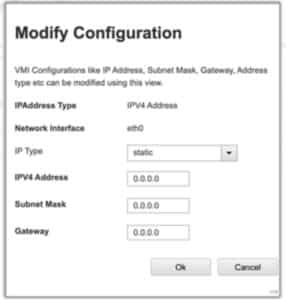
We choose the eth0 port, action, and set it as type “dynamic”. Though it does default to static as shown below:
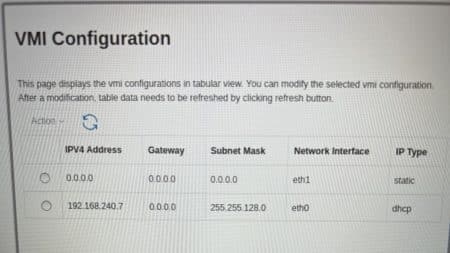
Once completed it ultimately resolved our “No Connection” problem.
After originally posting this article, Andrey Klyachkin shared via Twitter the following link to fantastic EBMC videos.
https://mediacenter.ibm.com/channel/POWER10%2B%2BEBMC%2BVideo%2BSeries/257624232
The one on the top 3 things, includes the VMI and it is here.
Hypervisor Overhead
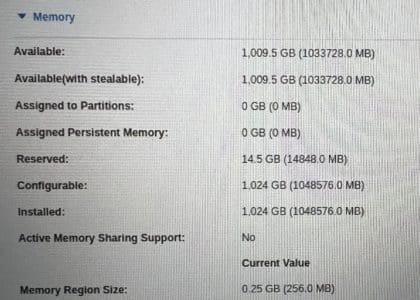
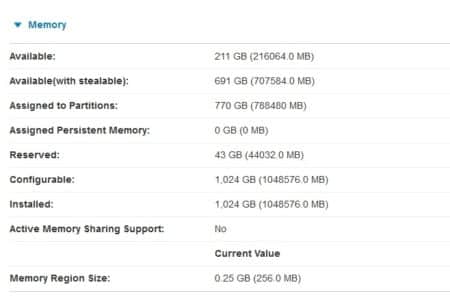
This brand new 9105-42A system with 24 cores/1TB memory/EMX0 expansion unit has consumed over 14.5GB in overhead before configuring a single partition. That seems like a lot from the start. The system also consists of following adapters:
- (4) EC2U 25/10 Gb NIC & RoCE SFP28 Adapters (SR-IOV capable)
- (4) EN1A 32Gb 2-port Fiber Channel PCIe3 Adapters
- (1) EN1C 16Gb 4-port Fiber Channel PCIe3 Adapter
- (1) EJ10 SAS 6Gb 4-Port PCIe3 Adapter
- (1) EJ2A Expansion I/O drawer Adapter
Upon further review, testing, and feedback from support line we have surmised the following. Support previously informed us via another customer of “the two SRIOV adapters in shared mode use 5.25g”. Enabling the EC2U adapters from dedicated to shared mode had NO effect on the overhead. There appears no way to get that overhead back. This at a rate of ~ 2.6GB per card. Since we know there is about 5.25GB for two cards, and this environment has four of those cards, that explains ~10.5GB of the overhead from the very beginning. There is also another 1.25GB required for the VMI “hidden partition”. The DMA for the card slots is another ~2GB (not including expansion drawer, if applicable). That explains almost all of the reserved overhead. Like or it not, that does work out about right.
So how would’ve we known this? Use the System Planning Tool (SPT). We did that. It’s all over the map. It says with our hardware config and with ONLY the two VIOS configured it would use 87.5GB. WHAT?! No way. Oh wait, it defaults to firmware memory mirror enabled, turned that off and now shows 42.5GB without any other LPARs built out. Once filling in all the LPAR sizes it comes back with ~63GB.
For comparison, in our real environment we configured all 21 lpars, with NPIV, VNIC, some VSCSI and used 43GB as shown in pic below.
That is a delta of almost 50%. But I suspect it’s better to estimate an overage than a shortage. But still not particularly close.
1030.01(030) System Firmware
This new S1024 came preinstalled with fw1020.10 (85) as shown below.
A newer version, 1030.01(030) is already available so of course we want to implement the latest and greatest.
Following below is the special instructions that come with the updated firmware level. It is important and yet only partially helpful. I’ll explain why as I learned, well relearned I suppose is more correct, the hard way.
First off it says, “Concurrent Service Pack”. This normally implies it is non-disruptive, that is absolutely not the case. As shown in the following preview screen before installing it clearly says it’s disruptive.
Secondly because of a known issue it says you must install it twice consecutively, which is completely correct. As the level shown after the first install follows below you can see the install and activated levels differ.
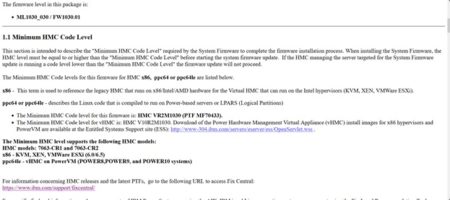
What is not explicitly called out in the special instructions that the HMC version must be a minimum of V10R2M1030. The “Check Readiness” prior to performing a firmware update has nothing to do with checking the target level at all, it’s doesn’t even know what you are going to update to just if the system is in a state of Ready to perform an update. You can still install the firmware update the first time, to complete it and then lose access to the managed system with the dreaded “Version Mismatch” message as shown below:
Though we already had plans to updating HMC to latest and greatest we weren’t planning on doing so right this minute, but that has changed. Note, it’s not an update, it’s an upgrade, so it too is completely disruptive. But upgrading to V10R2M1030 did indeed resolve the mismatch.
Upon further review, thanks Tsvetan Marinov for the reminder, the HMC M1030 requirement is clearly covered in the 01ML1030_026_026.html file. But for reasons I can’t explain why we didn’t get that file in our download as shown below.
Contents of that html file can also be found here. The main bit about the HMC version required is seen below:
A long history of experience means I should’ve known better. But those new to it, may not know at all.

